Carrying on with the instructions for personalizing your blogger design, this post will explain the functions in the Layout tab.
Under the main layout tab you'll find a series of other pages: Page Elements, Fonts and Colours, Edit HTML and Pick New Template.
Page Elements
The page elements tab is where you'll find things like gadgets (other blogging platforms like wordpress call these add-ons "widgets", blogger calls them gadgets). Depending on the Blogger template you are using you will either have a "sidebar" on the left hand or right hand side, or in some cases you may have one both sides, with the post template in the middle. These instructions are for use with templates available directly through the "pick template" function in Blogger. If you've uploaded a custom template, these instructions may work the same.
In the following image you'll notice a couple of errors on the page - it doesn't say "error" but I know it is one. In the right hand column there is no "ad gadget" link at the top of the column, and there should be. If you follow the sidebar column to the bottom, you'll notice that it is cut off, with no access to any of the gadgets beneath the last HTML/Javascript gadget.
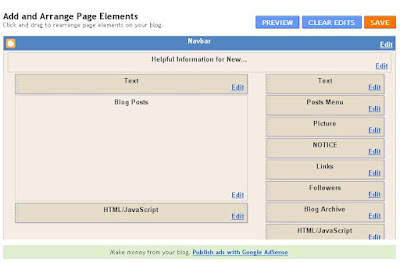
I have no idea why this occurs, but it has ocurred in my blogger account for a long time now. The way I get it to correct is to click the "view blog" link in the menu at the top of the page.

This loads the blog into the browser. In the navbar there is an option to customize your blog. If you click that, it takes you back to the layout page, but shows the correct editing functions now. This may not be necessary for everyone - many blogs seem to work properly, but if you find yours giving the same errors, try the fix I've posted.
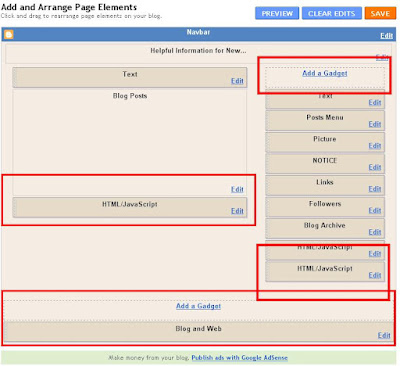
To add different things to your sidebars, or above or below the main posting template you click the "add gadget" link for the area where you want to add that item. There are numerous gadgets available - a text box for just adding text, a link gadget for adding lists of links (in the sidebar of this blog you are reading, the menu was created using a links gadget), a picture gadget for adding pictures, an HTML/Javascript for adding things like codes (and javascripts, like adsense or others), there's even an adsense gadget.
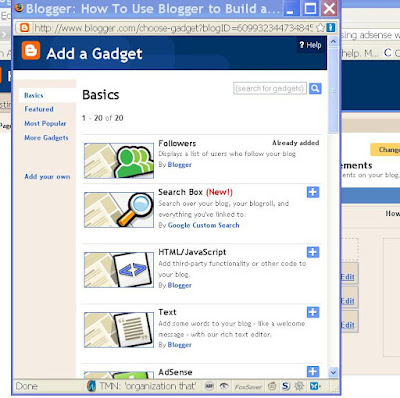
When you click the add gadget link, a box opens with a bunch of gadgets in a list that you can scroll through and select the gadget you want to add. When you select a gadget to add, if it has parameters for you to set (like links to add, or a picture to add, colors, etc.) the gadget opens to allow you to make these entries, and when you click save, the new gadget appears in your sidebar.
Adding gadgets to your footer, below your header or at the end of the posts template works in the same way.
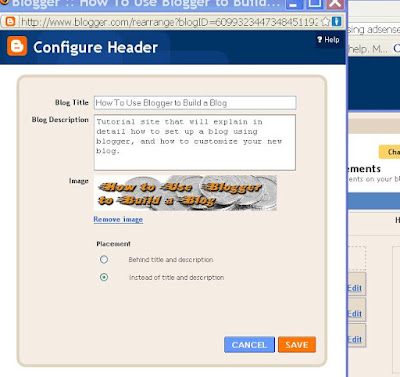
To make changes to your header, like replacing it with a picture or changing the title that displays, select the edit button on the header (right below the navbar). If your template allows images to display instead of (or behind) the text for your header the option will be here to upload an image, and to decide if you want it to be instead of the title, or behind the title. If you have a header image that you've already added text to, then you would want choose "instead of", but if you just have a picture and still want to see the title of your blog, then you would select "behind".
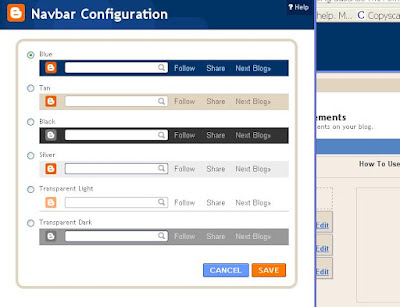
 You can make changes to the colour of your navbar so that it more closely matches the colours selected for your blog, or so that it contrasts. Click the edit button on the navbar and select the choice you want for your navbar color.
Fonts and Colors
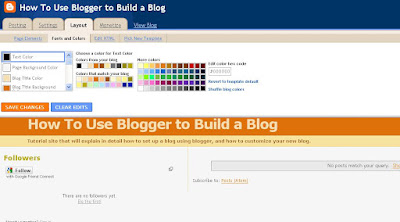
To go beyond just adding gadgets, you can set the fonts and colours in your blog by choosing the fonts and colours tab. The opens an editing box above your blog. On the left you'll see a list of the items you can change the colours for in your blog. Different template choices allow different options - some allow changing the background colours, while some don't. As you make the colour changes the results will display in your blog below. Once you are satisfied, click save.
Edit HTML
This one I'll leave til the next post.
Pick New Template
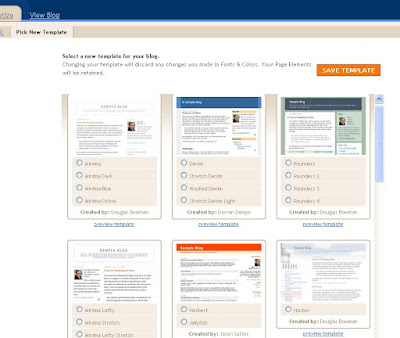
This option allows you to browse and select the standard blogger templates to preview how your blog would look before opting to change it. When you click the Pick New Template link, the templates page opens. To preview a different template, click the radio button in the one you want to see and then select the preview link below it. It will show you how your blog will look using that template.

No comments:
Post a Comment
Please DO NOT DROP LINKS HERE using monetized URL shorteners or the comments will be marked as spam. DO NOT post links to affiliate sites or links to promote your website. This is a "NO FOLLOW" blog.
If you want help with an actual blog or website, please just post for help in the Adsense forum. I will not publish comments with blog/website, app, or channel links.
Thanks.