NOTE: For information on editing and creating your blog using the Blogger in Draft, and the new Template Designer, please see this OTHER (newer) post!
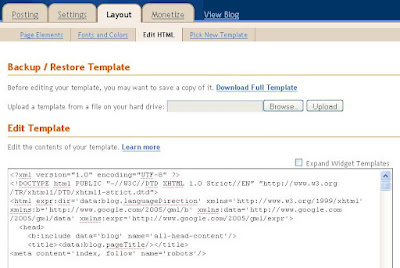
Here we are, on the last step of the basic editing process for your blogger. This option can be found in your Layout section under "Edit HTML", and it looks like this when you get to the page:
 The first thing you want to do is backup your template, so click the "Download Full Template" link and save it. If you are using a basic blogger template and haven't made any customized changes to the HTML then you probably don't need to do this, but it's a good habit to get into.
You will also want to backup your blog itself, so go to the Settings Tab and Select Basic. Right at the top is an option to export or import a blog. Select the Export option and save the blog on your hard drive. If anything goes wrong when you edit the html of your template you now have the data in your blog (the blog backup) and the original data from your template (the template backup) so you can restore your blog.
Editing the HTML is really not such a good idea if you don't have any experience at all with coding or html - blog templates contain CSS codes too, and if you aren't familiar with this, making a change in one place of the CSS can horribly affect something else, or can have no affect at all, because something needs changed elsewhere within the template.
Since the instructions I am giving are for total newbies (ie: people with no blogging or website editing experience) covering this sort of html change would take much more than a few simple instructions.
What I will show you is how to add things like the verification code for webmaster tools, or google analytics, or third party statcounters.
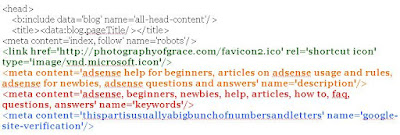
It's usually fairly simple since they actually give you the code and instruct you where to place it. The verification code goes in the head section of the template (see the blue text below), and you can also edit your blog description in the meta content (see the orange text), as well as adding additional keywords (see the red text). These are very simple edits, and as long as you keep your additions between the brackets and the quote marks, you should be fine. Note that you can add codes to the html/javascript widgets also and some codes require that they be added at the end of the body section, so be sure to read the instructions for whatever code you are planning to use.
Be careful when adding extra keywords. Keywords should only relate to your blog's content and subject matter. Trying to put keywords here that you think are "highly paying" but have nothing to do with your blog will actually lose you results in the search engine. Keep your keywords to a reasonable number - between 7 and 15 is usually good. Too many and your site could be considered spam, or could be penalized in searches because of keyword stuffing. Sometimes more is not better. The same can be said of the description field - don't make this too long, and make sure it describes your blog and it's contents.

The last thing you'll notice in the code above is one I added for a favicon - that's the little picture that displays beside the url of your blog in your browser's search bar - for standard blogger blogs, it's usually Blogger's white "B" in the orange square, but you can have your own if you want.
The first thing you need to is create the icon file. If you don't do image or graphic stuff at all, you could just do a web search for free icons, and find one you like that matches your blog, but they aren't hard to create. Many free image software programs can create an icon file from a picture. You will need to crop and resize your image file to 32 X 32 pixels, so make sure whatever you choose can actually be seen and recognized at that size. Then you need to save the file with a .ico extension, so make sure your editing software can do that.
You need to upload that file somewhere that you can link to it - photobucket, imagecave, your own web server, or even a picasa album.
Insert the code for the icon file into the html of your template (see the green code). Where the example shows this url reference:
http : //photographyofgrace.com/ favicon2.ico
You need to remove that (unless of course you plan to use my favico) and replace it with the url to your own favicon file. The balance of the code remains the same.
If you look around the internet, you'll find other easy tweaks you add into the head section of your template's html - things that can help with SEO for instance.
If you really want to edit the design portion of your template, the wisest thing to do is download the template and play around with it in an editor (try NVu or AlleyCode - they're both free). Once you have something you like, you can upload it (after backing up everything) using the "Upload a template from a file on your hard drive" option on the Edit Html page.
That's also how you upload any free template you might find on the web.
That pretty much concludes the basic editing for blogs, and getting started with Blogger.

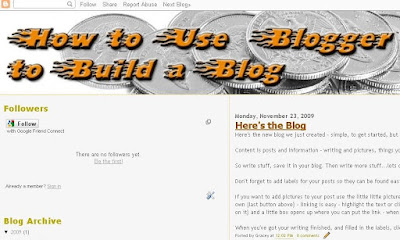
Remember the blog we first started off with? Well, it's had some changes over the course of this little series, and now it's finished and ready for someone to blog their heart out (have a look):
Here we are, on the last step of the basic editing process for your blogger. This option can be found in your Layout section under "Edit HTML", and it looks like this when you get to the page:
 The first thing you want to do is backup your template, so click the "Download Full Template" link and save it. If you are using a basic blogger template and haven't made any customized changes to the HTML then you probably don't need to do this, but it's a good habit to get into.
You will also want to backup your blog itself, so go to the Settings Tab and Select Basic. Right at the top is an option to export or import a blog. Select the Export option and save the blog on your hard drive. If anything goes wrong when you edit the html of your template you now have the data in your blog (the blog backup) and the original data from your template (the template backup) so you can restore your blog.
Editing the HTML is really not such a good idea if you don't have any experience at all with coding or html - blog templates contain CSS codes too, and if you aren't familiar with this, making a change in one place of the CSS can horribly affect something else, or can have no affect at all, because something needs changed elsewhere within the template.
Since the instructions I am giving are for total newbies (ie: people with no blogging or website editing experience) covering this sort of html change would take much more than a few simple instructions.
What I will show you is how to add things like the verification code for webmaster tools, or google analytics, or third party statcounters.
It's usually fairly simple since they actually give you the code and instruct you where to place it. The verification code goes in the head section of the template (see the blue text below), and you can also edit your blog description in the meta content (see the orange text), as well as adding additional keywords (see the red text). These are very simple edits, and as long as you keep your additions between the brackets and the quote marks, you should be fine. Note that you can add codes to the html/javascript widgets also and some codes require that they be added at the end of the body section, so be sure to read the instructions for whatever code you are planning to use.
Be careful when adding extra keywords. Keywords should only relate to your blog's content and subject matter. Trying to put keywords here that you think are "highly paying" but have nothing to do with your blog will actually lose you results in the search engine. Keep your keywords to a reasonable number - between 7 and 15 is usually good. Too many and your site could be considered spam, or could be penalized in searches because of keyword stuffing. Sometimes more is not better. The same can be said of the description field - don't make this too long, and make sure it describes your blog and it's contents.

The last thing you'll notice in the code above is one I added for a favicon - that's the little picture that displays beside the url of your blog in your browser's search bar - for standard blogger blogs, it's usually Blogger's white "B" in the orange square, but you can have your own if you want.
The first thing you need to is create the icon file. If you don't do image or graphic stuff at all, you could just do a web search for free icons, and find one you like that matches your blog, but they aren't hard to create. Many free image software programs can create an icon file from a picture. You will need to crop and resize your image file to 32 X 32 pixels, so make sure whatever you choose can actually be seen and recognized at that size. Then you need to save the file with a .ico extension, so make sure your editing software can do that.
You need to upload that file somewhere that you can link to it - photobucket, imagecave, your own web server, or even a picasa album.
Insert the code for the icon file into the html of your template (see the green code). Where the example shows this url reference:
http : //photographyofgrace.com/ favicon2.ico
You need to remove that (unless of course you plan to use my favico) and replace it with the url to your own favicon file. The balance of the code remains the same.
If you look around the internet, you'll find other easy tweaks you add into the head section of your template's html - things that can help with SEO for instance.
If you really want to edit the design portion of your template, the wisest thing to do is download the template and play around with it in an editor (try NVu or AlleyCode - they're both free). Once you have something you like, you can upload it (after backing up everything) using the "Upload a template from a file on your hard drive" option on the Edit Html page.
That's also how you upload any free template you might find on the web.
That pretty much concludes the basic editing for blogs, and getting started with Blogger.

Remember the blog we first started off with? Well, it's had some changes over the course of this little series, and now it's finished and ready for someone to blog their heart out (have a look):

this has been very helpful ...
ReplyDeletethank you ...
I downloaded a blogger template and it came with a navigation bar but I dont know how to costumize it?
ReplyDeleteBrad, what are you trying to edit on the template?
ReplyDeleteIf you are trying to edit the template itself, you'll need to understand how to do some coding. Custom built templates can't be "edited" using the template designer in blogger, so you have to edit the html of the template itself.
If you simply want to edit the navbar, then you should be able to select the navigation bar gadget on the design page of blogger and choose the navigation bar you want.
If neither of those is what you are trying to do, you'll need to give me more information on what you are trying to do.
Comment was helpful
ReplyDeleteThank you very much
Great post, and great blog overall. You've been very helpful in getting my Blogger blog up and running. At first I struggled so much with this and was this close to hiring an seo company to do it for me, I get frustrated easily with technology. But I feel a little bit better about sticking with it. Thanks
ReplyDeleteI always forgot to back-up template when I edit it.
ReplyDeleteNice informative stuff as always!Thanks for sharing your great experience and knowledge here with us.It's been very useful for us..Template Design
ReplyDelete